Buckle up for all things mouse house y’all. This is a long one but I really wanted to document the process and a lot of folks on instagram asked me questions about many different parts of this adventure so I wanted to break it down for you. If you prefer a quicker version, I talk you through it over the course of a few reels I made on instagram.
Parts – one / two / three / four
BACKSTORY / INSPIRATION:
This part of our journey has less to do with the process and everything to do with the why and how our sweet little mouse house came to be. Once upon a time, we were two fancy free love birds strolling the streets of Copenhagen on our two week honeymoon tour around Scandinavia. As we explored and passed darling shops here and there I kept seeing these sweet mice peering out of the shop windows with such charm and whimsy. So much so that I finally exclaimed to my husband, “what are these mice we are seeing everywhere?! I want them all!”. At the time, our little Z was not even a sparkle in our eyes so I let those little mice be. Fast forward a couple years and a few friends with older kids had begun collecting these guys. It jogged my memory of the most special trip and those precious little mice in the windows. Sure enough, the world of Maileg caught on over in these parts. Kids and adults alike fell in love. When Z turned one, my best friend Heather gifted him “dad mouse” complete with plaid board shorts and TATTOOS. I was tickled to death over the utter resemblance of Z’s dad. I began following @Mailegworld on instagram while my friends kids collections were growing and bringing so much joy! Dad mouse stayed on a shelf for a while safe from tiny hands. Christmas came around that year and it absolutely broke me. I ordered brother and sister Christmas mice, a plaid couch and some other delightful holiday accessories. I thought to myself, if Z doesn’t take to these, they will just be adorable Christmas decorations. Plus they make me happy. Along the way, a little mouse or tiny piglet here and there got added to our collection. He absolutely lost it over the pig and loved tucking it into the little crate and blankey it came with. It became a thing. Then, I can’t remember how I came across the various houses (Maileg brand and other DIYs) but I realized our friends needed a place to live. I saw the Ikea house online and thought it was the perfect size and had options beyond a traditional dollhouse. I ordered it with the intentions to simply paint it to match his room. It sat unfinished for months but was still enjoyed by Z and our mouse friends. I got more invested into my search for what could be a boy version of a dollhouse. Surely there had to be some charming ideas for little boys since they also have all kinds of little toys that could use a house of sorts! Sadly not much turned up. So I set my mind to making a “clubhouse” that felt like somewhere a little boy would want to hang out with his animal friends and maybe some superheroes too. I didn’t want to lose the charm of the Maileg brand so the first thing I ordered was wallpaper from their website. I told myself okay, we’ll wallpaper and add flooring and then we will be done…HA! So it begun, a rabbit hole of inspiring renovations, a whole world of miniature makers, a community of Maileg collectors seeking out retired, top dollar past designs even! As most of us DIYers know…it’s always bigger than we plan for it to be…
RENO BEGINNINGS & BASE INTERIOR DETAILS:
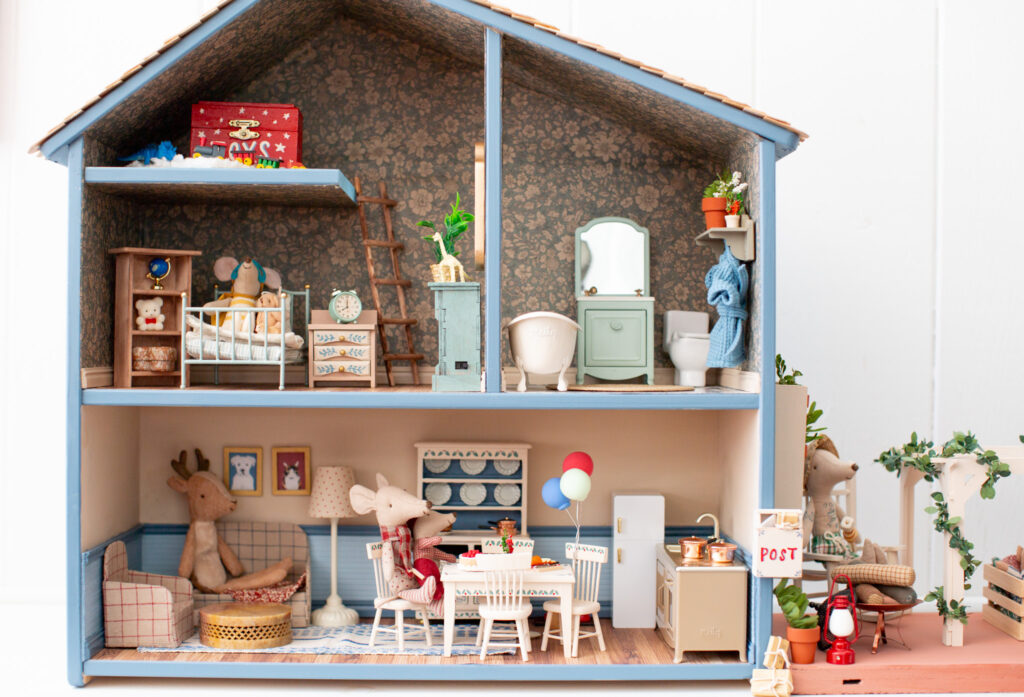
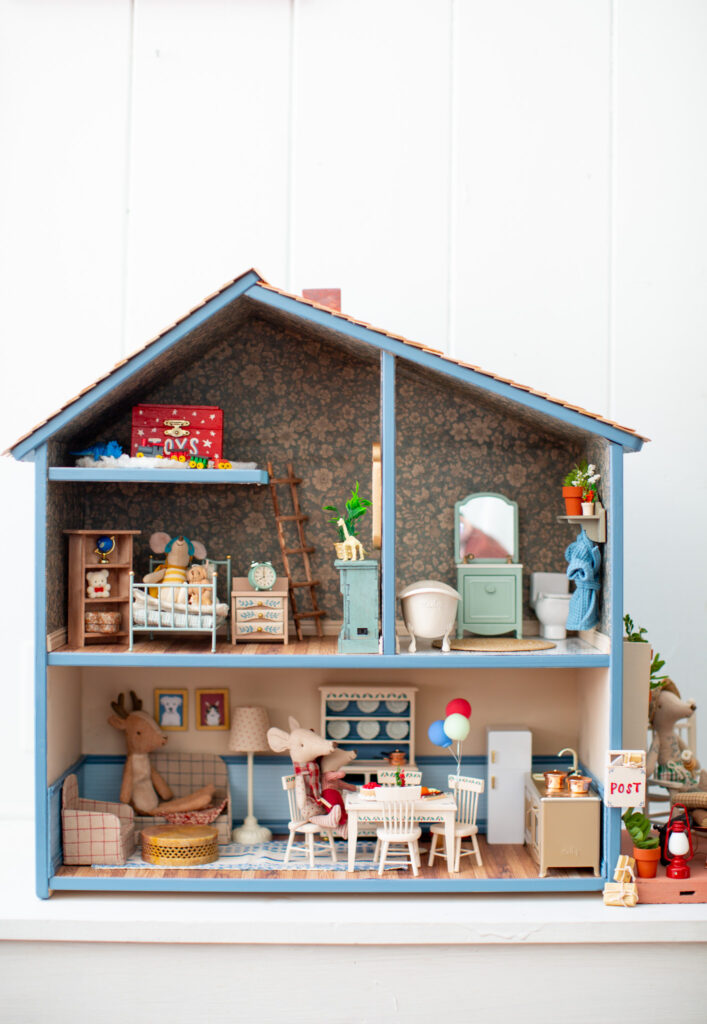
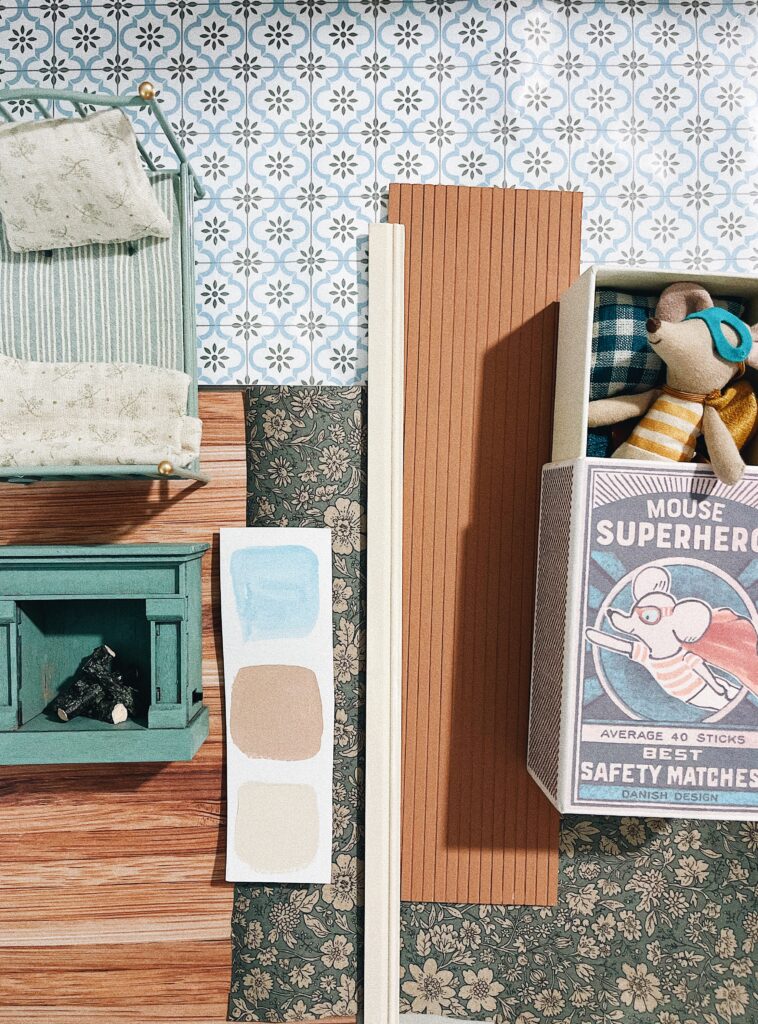
Truly I had no idea what I was doing when I started. Like I said, the only plan was to paint it cute to match his room. Jokes on me. I made a little mood board to try and stick with a color palette. I did start painting the exterior first with a leftover sample pot of this pretty French blue from past home projects (well technically first I filled the nail holes with caulk). I decided to tackle the shingles on the roof next which I was a bit nervous to do. Honestly this was so easy. It was just time consuming. I used the wood glue and carefully line up the first row, starting from the base of the roof going up. Then I continued to layer them, a new row on top of the previous row. I made a line of wood glue across the existing row and added a dab to the back of each chip before gently pressing it down. The glue is not super noticeable against the wood color but it doesn’t dry totally clear. So just something to be mindful of. I kept a damp paper towel on hand to gently wipe away some excess. If you look at the photo below, you can see how the Ikea house here has an asymmetrical roof line. I did the longer side first then on the shorter side I had to cut the top row a bit shorter so it lined up. Then I cut another small row of chips to cover that little overlap piece (close up photo below). I really wasn’t sure what to do with the roof line / overhang so I winged it. I don’t think you have to cover it but from the side view, it’s just the look I preferred over seeing the wood edge of the original house. Either way would be fine if you don’t have the patience after doing this whole roof, haha. I definitely had to take breaks and work on it here and there. The piece I used to create the little playroom / loft above the ‘bedroom’ came from the bottom of the Ikea house. It normally separates the bottom floor but I wanted to leave it open to have more furniture space. So I painted the checkerboard pattered floor and drilled it into the side of the house.
Next I did the flooring, another easy step that just requires a bit of care and patience. I decided to use peel and stick to keep it simple. I loved the look of this “wood” as I thought it resembled our actual wood flooring in our home! The pack I ordered (linked below) was enough to cover the bedroom and bottom story. The patience part of this step is for lining it up in the corners while the adhesive is exposed and your holding it up so it doesn’t touch anything else, ha. I used my paper cutter to make sure I got a perfect straight line where the bedroom meets the bathroom. Then just gently press down and repeat. Exact same method for the tile in the bathroom. I did find so many pretty tiles on Etsy that I debated purchasing. As in, individual tiles that you would lay just like the roof chips. I decided to pass however, I think if you are up for the challenge that the texture of tiles would give it such a nice look. I may revisit this idea in the form of bricks for our mouse patio.
Next I did the wallpaper. Enter the struggle between a little boys clubhouse and a moms desire to maintain charm. I ultimately landed on Maileg gift wrap as I just really wanted to keep the whimsy of the brand since it was my main source of inspiration. It’s blue at least, ha. So the wallpaper was a bit of a beast at times and probably because I was working with a gift wrap roll. I measured the walls, cut the paper in a rectangle to the measurements. Once I tested it out and made sure the width and tallest area were correct, I carefully used my exacto knife to cut along the angles. Once I made sure it was an almost perfect fit, I used acid free glue on the back of the paper. As I laid it onto the walls, I used a popsicle stick to gently smooth as I went. This was to insure that I got any bubbles / glue globs smoothed out. I used a damp paper towel again to gently wipe away excess although this does dry clear. If you are going to add baseboard, you have a bit of leeway at the bottom of the paper since it will be covered. For the bottom story, I painted the walls a neutral color and added the wainscoting there. I used my husbands table saw to cut this because it was already set up (the wood is not thick at all, you most certainly don’t need a saw). Lastly, we did the baseboards. This is the part that made me lol if you watched the videos. My husband pretended to not meddle in my renovation process but once he saw me trying to stick those baseboards in with no angles he couldn’t stand it. I will say it turned out nicely and they fit perfectly in the corners this way but it was tedious and probably not necessary if you plan to have furniture all around. I used the wood glue once again to adhere the wainscoting panels and the baseboards.
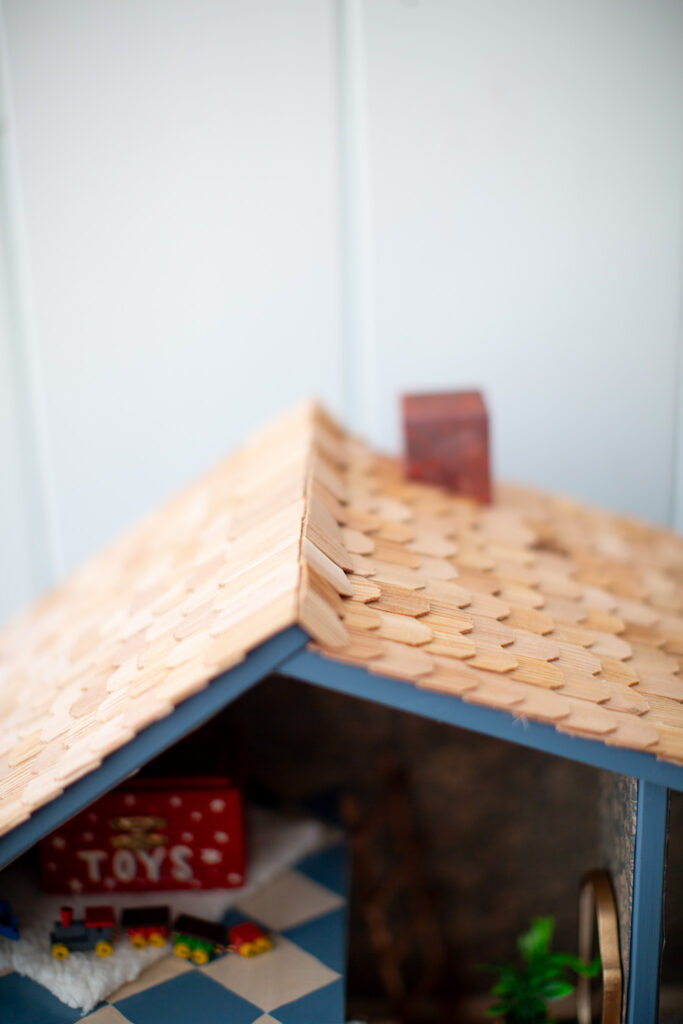
Here you see the close up’s of the roof and that angled piece I mentioned above. I hem hauled around about the exterior. Pondering if I should have cut windows or not. Maybe I should have but I still really like how these turned out. I painted them the same neutral color as the rest of the trim. When I held them up to measure, I realized it would be kind of strange to see the blue exterior. So I traced the outline of each window and using some white paint, watered down, I gently brushed it on and rubbed a bit off with a paper towel to give it the texture look like maybe there are shades or blinds on the inside. Ha. Not that it has to be realistic but for some reason it bothered me to be blue. You know I had to take it a step further and paint some vines growing up the house. I saw a few dollhouse I loved that used faux leaves which gave me the idea because I thought it added to the charming cottage feel. I also debated hand painting an actual brick pattern on the chimney but decided to save time and mixed a dark red, rust and grey to paint it with a textured look that is still the color of brick. I love it!
FURNITURE:
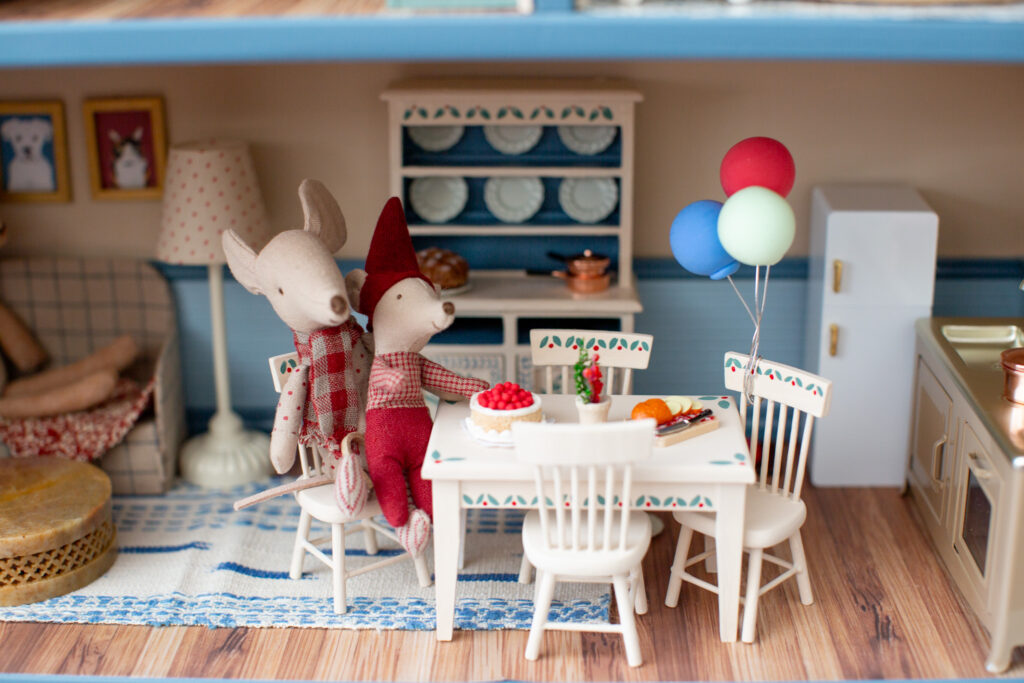
Okay so next we are getting to the most fun part! The furniture! I already had some Maileg pieces from our initial collecting / displaying them in Z’s room for Christmas. I knew I wanted to hand paint some things to make it extra special. Certain pieces from Maileg were just too perfect to pass up and I truly didn’t find anything that compares as far as detail and quality (and charm). Until I really went on a deep dive to fill the house, I had no idea that some of the pieces light up. I had the fireplace prior to all of this and just about screamed when I realized it took a little battery and turned on. It really makes it so magical and in turn, I deemed the Maileg lamp and lantern necessary items as well since they also light up. I have linked what I could find below, in two parts. The first product carousel is Maileg and if you scroll on down the other is for the craft store finds.
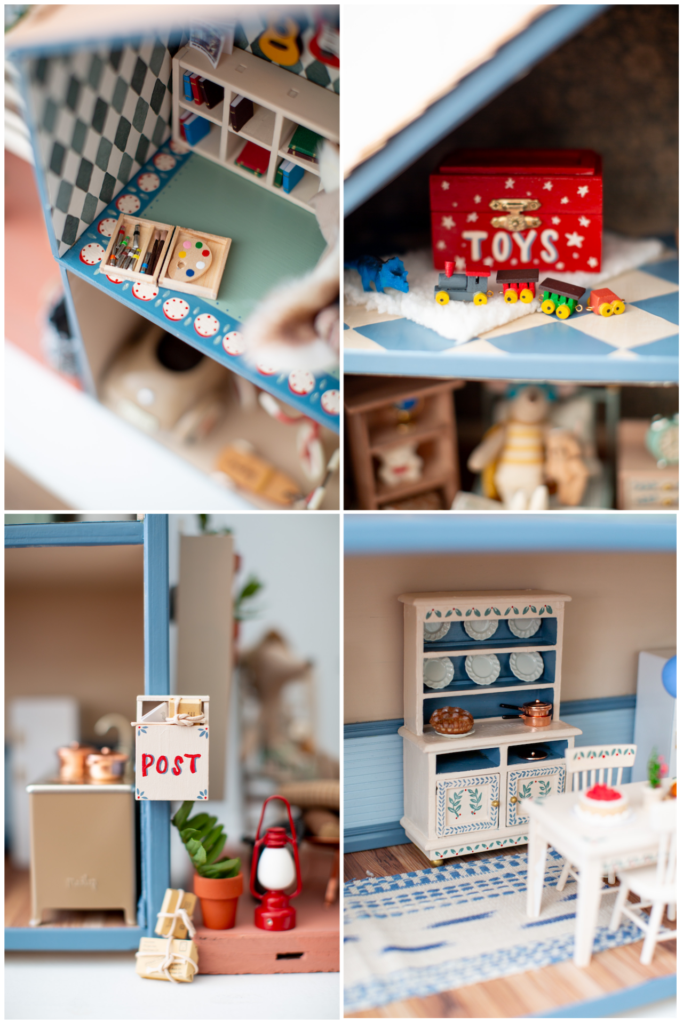
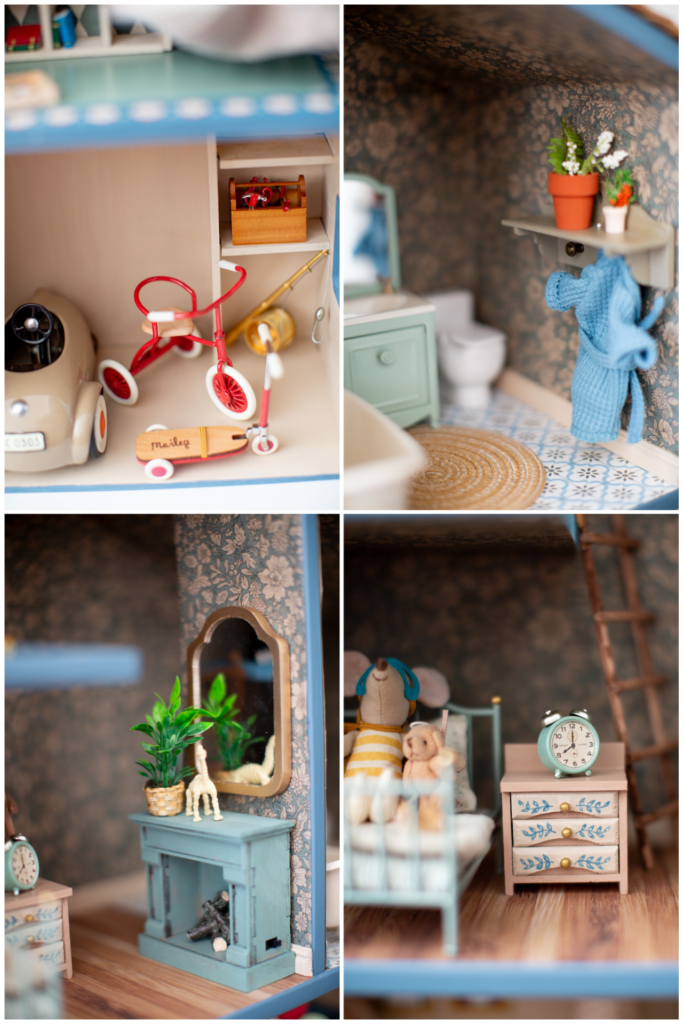
All of the hobby lobby stuff, for the most part, comes as natural wood or white. I painted the dining table, night stand, both bookshelves and toy box (all purchased at craft stores). I thrifted the hutch (which is Melissa & Doug brand), the plant shelf on the exterior, the wood base for the patio and the coffee table which is just a little marble trinket dish that was missing the lid! Not everything matches perfectly as Maileg only offers the furniture pieces in a couple color ways but I think with the hand painted items, it helps to bring it all together. For instance, the bed and bathroom vanity only come in this mint or blush. But I love them and added some sage leafy details on the other furniture here and there to bring in some more green. I made the ladder using wooden craft dowels that I cut and glued together with wood glue. I watered down some brown paint and gently brushed it on so it looked more like a wood stain then solid paint color.
ADD ON’S & ACCESSORIES:
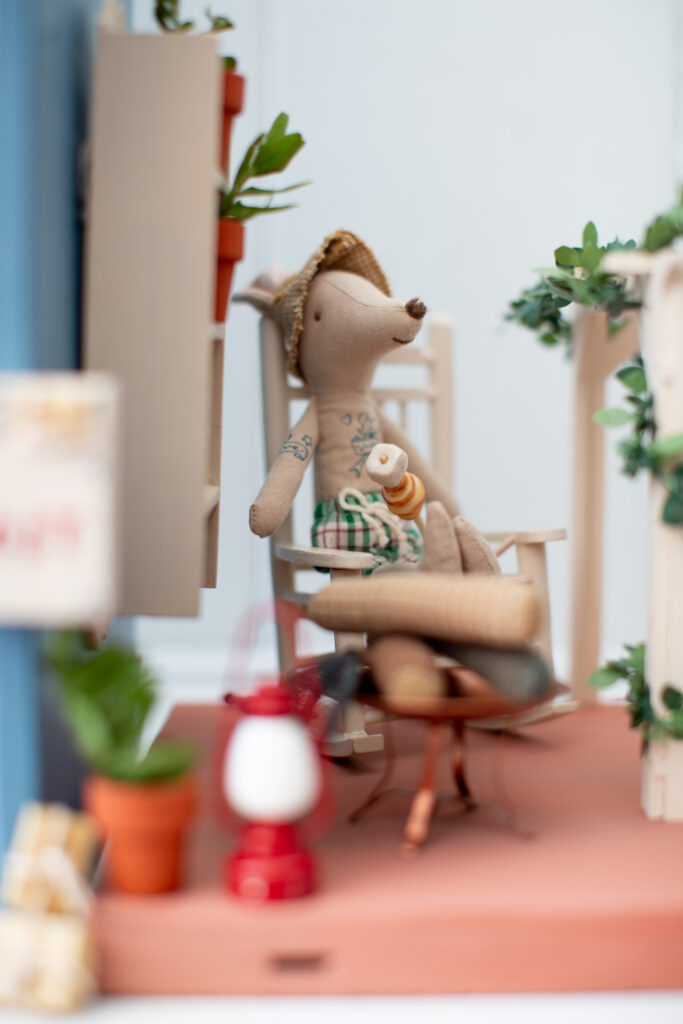
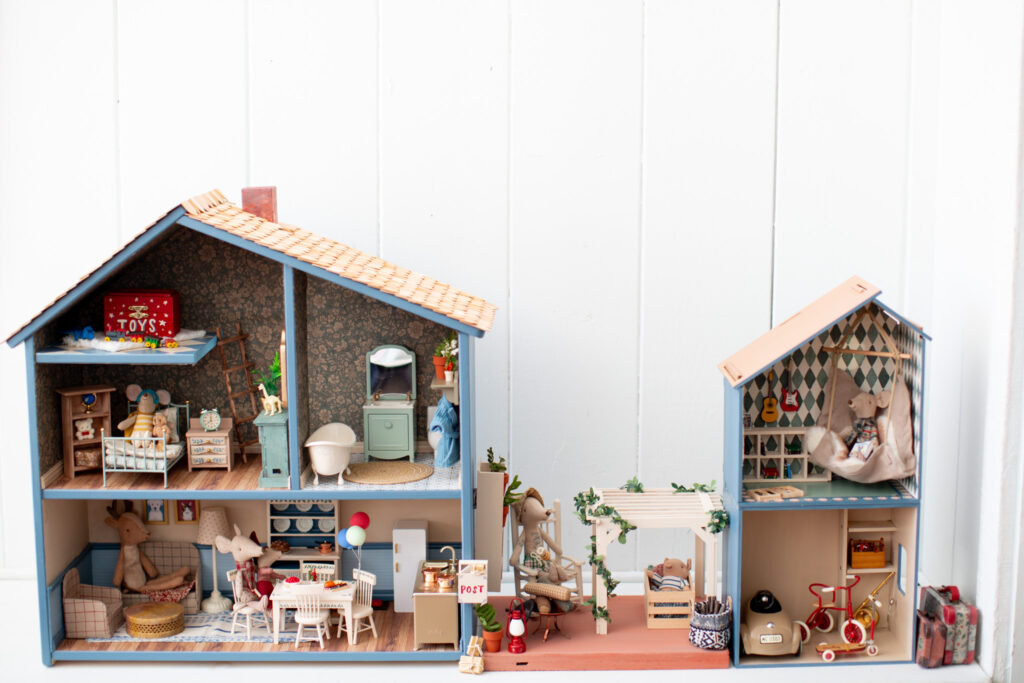
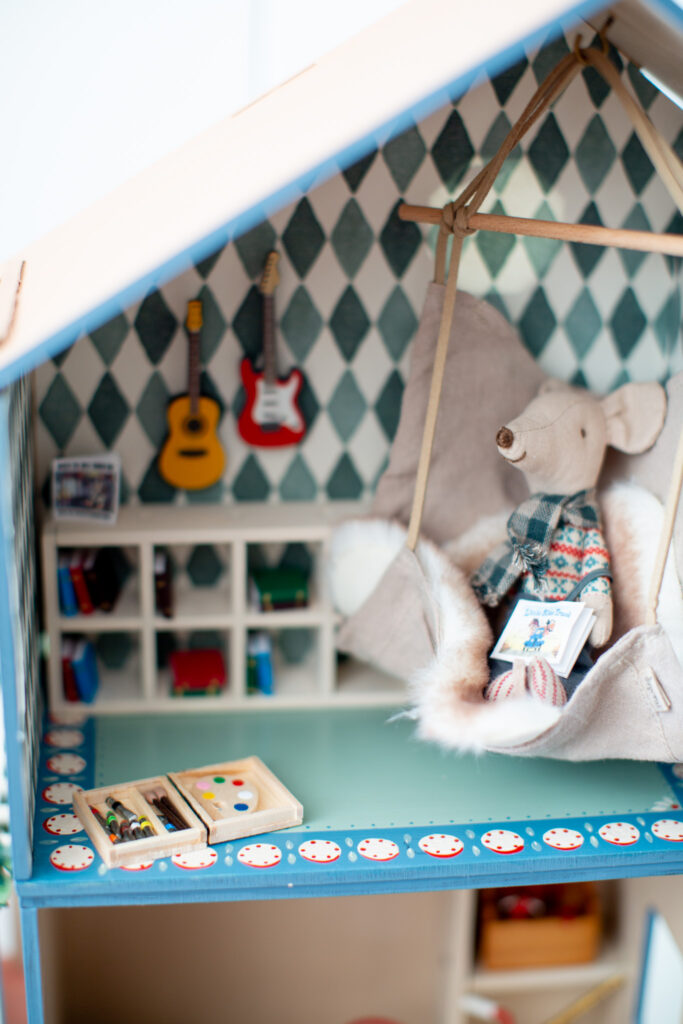
The more I became absolutely obsessed with making this and the more I looked at inspiration, I quickly realized I should have chosen a much larger house considering my many ideas. One thing I felt was missing was a garage. We have had the Maileg car for a while and it’s one of Z’s favorite things because there is a string to pull the mice around in it. So cute. On a trip to Michaels for more stuff I didn’t need, I saw these little model rooms and couldn’t resist. The “bungalow” seemed like it would be the perfect garage. I loved that it had little shelves since I had already bought the teeny tiny toolbox. Much to my delight, the mouse car fit perfectly while still having plenty of room for the scooter and tricycle he got for his birthday. I kept it simple here and used my same blue and neutral colors. On a separate trip, I found this “loft” which I thought would be cute as an over the garage cottage. I realized the angle of this roof would be the perfect spot for the Maileg hanging chair and so it became a room for all things creativity. Some books, the miniature paint set I picked up at Hobby Lobby and these little guitars. I felt I could tie in some more green here and so I painted the flooring! I really had no plan here I just started with the green, thought maybe it’s too much green and I needed to pull in a bit of red and blue for flow of colors so I added the border. It almost looks like a rug. In the meantime, this new wrapping paper print appeared on Maileg and I knew it would be perfect for our house! I am still in search of additional shingles because the color I have has been out of stock. So I do plan to finish the roof and add matching shingles at some point. I will probably attach the loft and garage as well so it doesn’t fall off while my son is playing. I wanted to make sure I was set on the layout before doing so though. Once these extra rooms were complete I still felt like something was missing, *rolls eyes*. For Z’s current interests though, I knew I need to make some sort of wonderful outdoor area. During the mouse house process, we were getting pavers laid in our backyard to make a patio and it really became a thing for Z. He loved watching the process and he LOVES to spend as much time as possible so I let that inspire our mouse patio. I found this piece of wood at the thrift store, very random I know. But when you have the vision, any piece of trash can be made into something new lol. Once again, I debated doing actual pavers or bricks here. I still might be crazy and do this but as this project became drawn out and we got closer to his birthday I decided I wanted to surprise him. So for time sake, I once again mixed a similar color palette as the chimney and painted it on in a blotchy manner to give it a bit of texture. The pergola and vines were more craft store finds which I painted / cut / hacked to my liking. He was gifted the bonfire set for his birthday and it is beyond perfect for our little tattooed dad mouse roasting marshmallows on the patio! The little wooden pots are from Michaels that I had from another project so I painted them terracotta and stuck some little vines in them. I saw another house on instagram with a mail box so I went on a deep dive to find it. The original red was super cute but I just had to paint it with my own lettering. The little packages! Ugh. The cherry on top. My last over the top little detail was the art prints. I have pet portraits I painted of our dog and cat hanging in our home from years ago. I had originally scanned them in to my computer so I used those files, added the red and blue backgrounds and scaled them to about 1.5″. I printed them on normal printer paper, cut them out and used a glue stick to stick them in the wooden frames I painted gold. I used adhesive dots to stick them on the wall. I ended up using those dots for the white plates I put in the hutch as I knew these would probably fall over a lot.
REVEAL:
The final step was arranging everything, gathering a few more little accessories based on Z’s current interests and setting it all up. I grabbed a teeny tiny cake and balloons for the table since this became a birthday present. He was totally in awe! While he did see some beginning stages and knew I was going to paint the house, he did not see most of the new furniture and accessories. So seeing everything together and finally being able to play with it all was so exciting. He noticed the portraits on the wall and said “there’s Blade and Fe! I can’t believe it!” I was so happy he loved everything. It now gets regularly rearranged, I set it back up, it get’s rearranged again. He’s having a lot of fun with it and makes up little stories about the mice. I absolutely cannot wait to decorate it for holidays. I hope that holds me over until I decide we need another room or two, haha.
WHAT I MADE:
Here is a quicker breakdown on what was made / painted / hacked –
Hand painted background colors and details on : the nightstand, dining room table and chairs, toy box, both book shelves, ladder, pergola, fire pit and the flooring for the toy loft area and the over garage loft. I thrifted : the patio wood base and painted it, the exterior plant shelf, the rocking chair and the coffee table is a marble trinket dish that was missing a lid. The toy loft rug was a piece of sample sherpa fabric and the rug runner downstairs I cut from a Schumacher fabric sample I had gotten for our house.
THOUGHTS ON MAILEG BRAND:
I will be the first to admit that I am maybe a little biased here. I LOVE the brand. The Danish nostalgia. The size of the mice for little hands. The color palette they most commonly use… I love it all. I understand that some pieces are pricey but hear me out. The quality, so far, has been unmatched. I love that many of the pieces are metal which seems more durable for a child. The hobby lobby wood furniture is very cheaply made but also just a few dollars, so not a huge deal to replace if needed. Reminder that Z just turned 3 and drops things on a regular basis with no damage so far. I have heard that their customer service is wonderful and that they typically replace broken parts with no problems. I am a broken record now in saying I really wanted to keep the charm and magic of Maileg since the mice inspired this whole ordeal. So I felt some pieces were necessary to achieve the look I wanted and I also feel that the quality pieces have longevity. Some of my friends kids who are in the 8-10 year old range still love their mice and have a house decorated for them and/or display them. So I felt the potential for these to be loved for a long time was there and that felt worth it to me. There are certainly some pieces I did not feel like I need to pay extra on. The toilet for instance, lol. Maileg’s is $28 and while it does look nicer, it didn’t feel like a special enough piece to me so I opted for the $6 version at Michaels. Same with the refrigerator. Yes, side by side of course Maileg has that little extra something but for $44 and just plain off white, I passed and got the $10 from Michaels knowing that I also may paint it a creamier shade down the road. The kitchen however, was a must. I didn’t know it came with a loaf of sourdough and was so happy when I opened the little oven to find it, ha. The bed with it’s perfect little linens was also irresistible. I figured the alarm clock would be over $20 but when it launched and was $13, it was an add to cart moment as well. I know I will pick up more here and there as new things come out. All of this research / inspiration search also led me to find a whole world of retired Maileg designs and a community of adult collectors who seek these out and are willing to pay top dollar. I truly couldn’t believe it and it now helps justify any future purchase thinking that I might have a small fortune one day, ha. Don’t believe me? Just google Maileg Circus. lol.
Also, if you are new to the brand, there is a size difference between “mouse” and “miniature” (they sell other sizes of animals). I ordered the miniature sink for the bathroom not knowing. It was precious but ridiculously large for this space and for the mouse. It was the easiest exchange process to get a different one. The hanging swing was also miniature but because it’s fabric, I felt like I loved it enough to make it work. However, it was too big for the main house. the ceiling wasn’t quite tall enough with the other pieces I had in there. Some of the mice come in the matchboxes and all of them have some sort of bedding (multiple pieces) so these actually would make perfect beds as well.
FINAL THOUGHTS:
Would I have done anything differently? I don’t think so. Other than a bigger house, which I don’t actually need so this is probably a good thing. I think that you could make a beautiful, well designed mouse house or dollhouse like this on a budget. The Hobby Lobby finds were so inexpensive I couldn’t believe it. Michael’s was not much more and they always have coupons. There are also many beautiful things on Etsy in a range of prices.
If we look at just the base of the house my costs were about –
House: $40
Wood Flooring: $12, tile flooring: $6
Wainscoting: $2 @ 3 packs
Baseboards: $4 @ 3 packs
Trim: $3.50 @ 3 packs
Shingles: $8 (will need an additional pack for the add on rooms)
Wood Glue: $4.50
Wallpaper: $14 @ 2 rolls (Maileg gift wrap, have tons leftover)
I always have paint and brushes so I can’t really count that since they are always being purchased for work
Base total: $128
From there you can spend as much or as little depending on whether you want to paint / thrift, buy all Maileg or mix it up like I did. I have seen people also use furniture from the Hearth & Hand toys at Target, Melissa & Doug dollhouse furniture, etc. I’m sure there are more brands out there that I don’t know of. The mice really make it for me but other friends would definitely fit in here and fit in the Maileg pieces. We have a tiny size Cuddle & Kind bunny, a couple of creative co-op animals, a few tiny Jellycats and Spidey and his Amazing Friends action figures…All who make regular visits to the mouse house and comfortably lounge.
Anyways. I could probably write another post this long on all the additional ideas I have but I will spare you. I am happy to answer any questions in the comments or if you follow along on instagram, feel free to comment on any of the four mouse house process reels! If you made it this far, thank you so much for reading. I hope you enjoyed all the nitty gritty behind the scenes of this project. It was such a fun one for me and even more so that Z absolutely loves it and plays with it regularly.
A few more sweet photos below.
XOXO